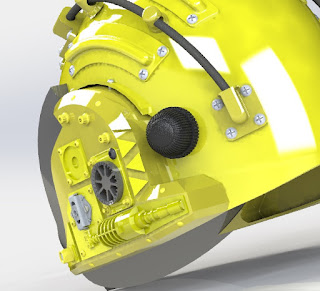
Making the parts for the right side
I've made all the parts that fit the right side now, some by mirroring existing parts in the helmet assembly and some by saving new models after mirroring them.
The most difficult one was the ear piece body, it had to be made into surfaces, knitted and made into a new solid and then mirrored as my CAD program coudn't handle the huge number or commands that it's built from. This made it into one manageable body that could be mirrored easily.
Then of course mating the parts where they needed to go.
Finding the bolts originally used (or close)
This is the side view I usually show.
As you may have noticed in the previous picture and this one, I've done some changes to some models.
The ear piece is thickened, screws are changed to the correct types and some things aren't visible in this image. However if I zoom in...
The similar but simpler models for the bolts are now replaced with exact representations of the bolt standards I've identified them as on the original helmets. I can of course be wrong, but they do look very close.
Bolt A
 |
| Shown both as steel and the yellow paint as seen on the helmet |
This seems to me to be a "
12 point Flange Screw 1/4" x 20 mm with torx drive pan head and security pin" bolt. However they don't come with a torx pan head and security pin but with a dome groove or flat top as standard.
The pin center and T15 torx pan head (which are a fully defined industry standard, just not for this bolt type) are clearly seen in screencaps and so is the outer shape with 12 flanges.
I chose the 1/4" size because it's the smallest stadard size of this bolt and matches very closely with the size seen I see in screencaps.
This custom bolt would require custom order to get manufactured and then likley in quantities of say 1000 pcs or more. I think I'll try to just 3d print them for starters.
Bolt B
This is a standard "
E-Torx M5x16", the earlier photos above show them but as I was writing the blog post I noticed they look rather like this instead:
This is the same but with a large flange, or sometimes they come with flange extender washers and look just like this. This is what the bolts set in the fan unit plate looks like.
 |
| Comparison screencap, note the wide flange on the bolts for the fan unit |
E stands for "External" and as the name implies this torx uses the inverse of normal torx that sticks out externally to fit a soccket wrench rather than a groove for a key tool.
This type of bolt is used in the automotive industry, on typically BMW cars of many generations and models, probably to reduce the risk of tampering without the proper tools. But BMW cars use the M8 and M10 sizes, not the smaller M5 and not with the wider flange. I mention these because when I searched on ebay for them these always popped up but not the smaller ones I wanted. :)
On the original helmets the E-torx (if this is indeed what it was used) looks sunk to make the flange look like a washer, so I did the same on my models.
I can probably find these as standard bolts on the web or if I ask Sifvert Skruv here in Sweden they may be able to get me some.


