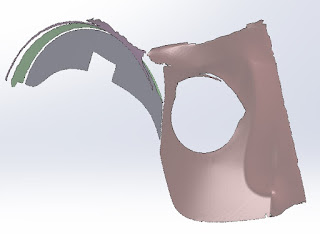
Scanned parts to make meeting surface
There's been and ongoing issue with making the ear piece back end fit to the helmet.I could theoretically print models in a number of iterations with changes to the depth it protrudes to get the fit but decided this was too time consuming and might still not produce a proper fit.
However, since I've bought a good scanner to scan other things (Cyberman parts, more on that in another blog) I might as well use it to scan the Procap helmet top.
I'm using an Einscan 3D SE, which is a professional scanner. Don't expect this result with a $200 scanner, I did that mistake and now I have a cheap barely functional hand held scanner I won't use as well as this one. ;)
I's not the greatest industrial scanner out there but uses projected light and not a laser range finder which makes it atually functional for scanning with precision. It's the least expensice that actually works as it should in other words and simply outstanding for a hobbyist.
These are the resutls from a simple non watertight scan. The scanner can scan outside and inside and combine the file to a complete hemlet to save as a printable file, but in this case the idea was to make it as "light" (not so big a file) as possible while retaining acceptable detail.
This was so I could work with it esaily in my CAD program.
Scanned Procap helmet side imported in 3D CAD
The surfaces critical for the fit
Surfaces recognized
The most critical back of head surface selected just to point it out.
the various surfaces sxtracted to give CAD 3D references and hopefully some surfaces and planes I can use to work with to improve the ear piece.
I lined up my older model and the most recent one together and then lined up the extracted scan surfaces as well.
The old ear pice I printed over a year ago had a big gap to the back of the helmet, the new one I modeled 6 months ago isn't exactly the right shape but much closer.


No comments:
Post a Comment
Post comments here: